
The Basics
So maybe you've built a few models, and you've managed to get them all together and painted close enough for your tastes. But you wonder if maybe there are better tools to use than your razor blade, your tube of glue, a couple rubber bands, and the paint brush that came with the pack of paints. Well, there are.
In fact, there are tons of tools out there for you to use. They range from simple to elaborate. And from dirt cheap to damned expensive. But the tool you should buy depends on what you can spend, and what you want to do. There are some 'must have' tools that you should consider buying if you intend to build more than a couple models and want them to have a decent appearance.
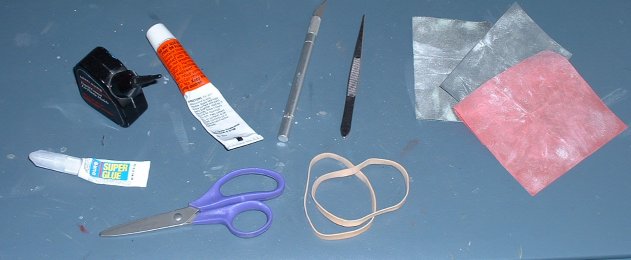
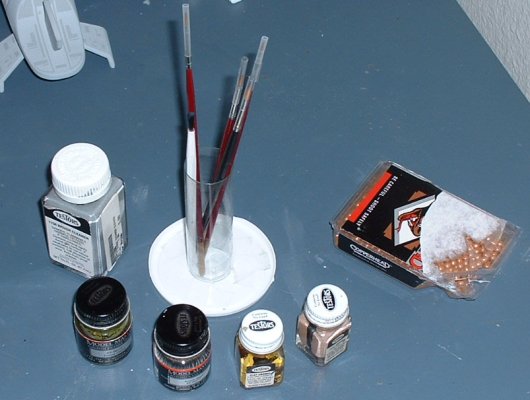
These are what I call "The Basics." Even if all you like to do is put models together and not spend all sorts of time working on them, these tools will make your work easier. You can also get some pretty good results using these tools. First off is the glue: get more than one type. The tube of glue is good for gluing large pieces together. The large amount of glue will help make a strong bond, and it has a slower drying time, allowing you to reposition your piece a little if you make a slight alignment error. The black glue bottle is good for precision placement, where you want the glue in one spot and one spot only. It also allows you to apply very small amounts, so gluing small pieces is easier. The 'super glue' is good for pieces you want to attach in a hurry, or for things that need a very strong bond. But don't use this for clear parts. Super glue will give off a vapor that will haze clear pieces.
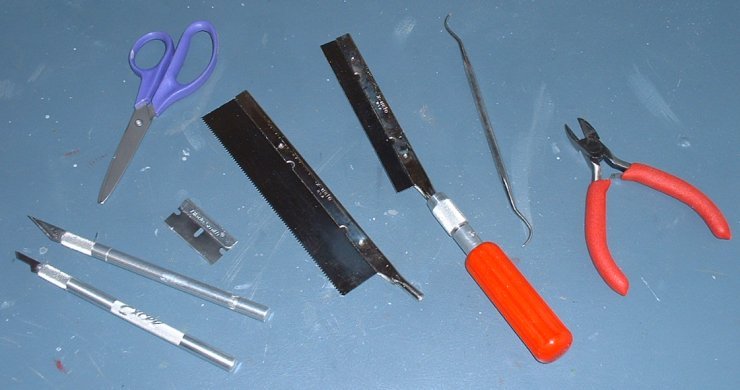
Next, you'll want a hobby knife. The angled tip and the handle allow you to make more precise cuts. This way you won't cut through your small pieces with your unwieldy razor blade. The scissors are for cutting decals. No need to dull your costly hobby knife blades. The tweezers are for holding small pieces and also for decal placement. Any tool that you can use in more than one way is good. The rubber bands will help you hold large things together, and they work great. Just don't get any glue under them. It will leave a mark on the plastic and can cause the band to stick to your glue joint. The different grits of sand paper allow you to smooth out lumps that you may encounter.
Tools for Experienced Modelers
Now on to the more advanced stuff. As you can see these are basically more advanced versions of what the basics are.
First off, cutting. As you can see, there is more than one way to cut plastic. Use different types of blades for different types of cutting. And feel free to just saw off any large piece that you don't want with razor saws. You can also use a scribing tool to scribe panel lines into your airplanes or space ships. You can also use it to cut completely through pieces to remove things like flaps or bay doors. Sometimes, I even use the scissors to cut pieces of sheet styrene when all I want is a smaller piece to work with. I also use small wire cutters to cut parts of a model tree.
When it comes to sanding, there are many more ways than simple sand paper. If I have a large section that I really need to work down, I get out the really rough stuff. Get some from your local hardware store. It's cheap and works great. You can get grits down to the type modelers use. From there, use the stuff you are familiar with. If you have a small nook that you have to smooth, use a file. They come in various shapes and forms to help you get around corners and let you smooth out the shape you want. Sanding sticks work like emery boards, and they come in more grits. You can also get flexible sanding strips to help you smooth out curved items like missiles.
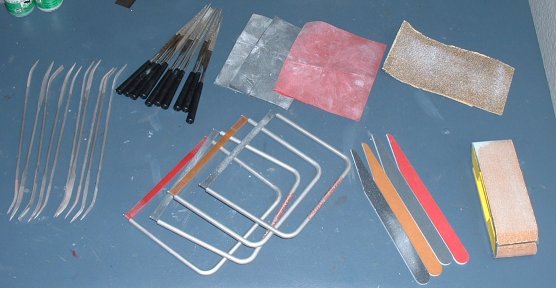
Now let's say you have a seam you want to fill in, or a hole that you don't want. All you need to do is fill it with putty, right? Well, you can make your job easier by getting a few items to help you out. If you have a long seam to fill, use the masking tape to make off the areas you don't want putty on. And try different brands of putty. The standard stuff you buy may not be ideal for your uses. And if you are in the habit of using your finger, try using a dull hobby knife. Or better yet, little spatulas can help you spread out the putty without getting it on your fingers.

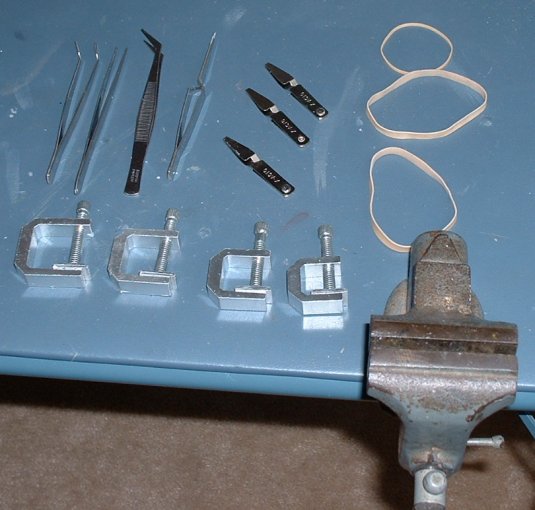
And now you need to hold something but your hands are getting tired? Well, the rubber band has always worked wonders for me. I actually went to an office supply store and bought a bag full of them. Better than getting the dirty ones off the newspaper. And if you have small items, tweezers works wonders. Different shapes can really help you out, and the self holding ones are great for holding a small item for a long time. You can also get mini clamps. These work great for large items. Small clips are great for small thin items like wings, but they can leave a mark if the plastic is soft, so use a piece of scrap plastic as a protector. And let's face it, sometimes you need to hold something large, and for a very long time. A small vice has been quite valuable to me for many years.
Once you get the model together, you still need to paint it and apply decals. For hand painting, get some nice brushes of varying sizes. For painting small details, it helps to have a small brush. And getting the proper colors of paints really helps. There are tons of them out there. Different brands too, so don't feel like you have to buy a specific brand all the time. And when you first get your paints, use the end of an old brush to stir them up. The paints will separate out while they sit on the rack. And then drop one or two copper BBs in with the paint. Now if all you do is give you paint a quick shake, the BBs will help you mix the paint up much better. But don't use steel, I've heard that steel can rust, changing the color of the paint.
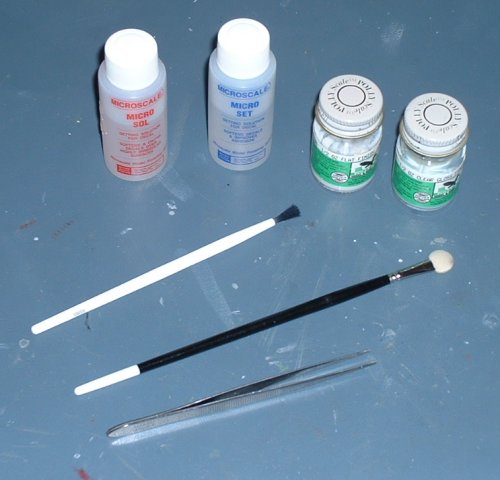
Applying decals is also a sticking point for many people. First off, you need a nice smooth surface to make decals stick well, so cover you model with a clear gloss coat. Future Floor Polish works wonders. It's thin enough for an airbrush, and makes a great shine. To help you apply the decals, get a setting kit to help the decals form around bumps and divots. I just brush on some setting solution right before I put on the decal and the apply the decal. I let the decal dry slightly, and once it's partly dry, I apply some decal solvent. This softens the decal and allows it to form to any imperfections on the surface. Then once all the decals are completely dry, I'll apply another clear coat, flat or gloss depending on the finish I want. I also use tweezers and a brush to apply my decals. The more I touch them, the more likely I am to break them. Use a sponge blotter to soak up small amounts of liquid around the decals. A large sponge can be hard to use and I don't want to move my decals by accident.
Advanced Tools
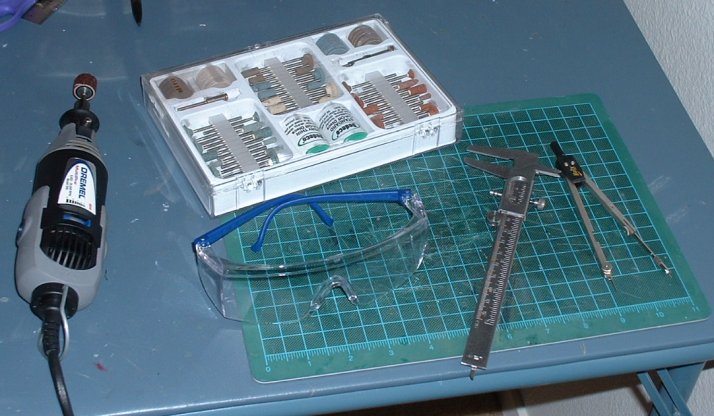
There are, of course, more advanced tools out there. I have a nice compass to help me with circles and the like. I also have a relatively cheap set of calipers. If I want to know the thickness of something, these work great. And I can use them to make sure the custom parts I make are all the same thickness. I also have a cutting board to keep me from cutting into my table. A new cutting board is much cheaper than a new table. And when I have to sand something large, or do a lot of cutting, a rotary tool works great. I also have tons of bits, so I can do just about anything with it you can think of. I make sure to wear my safety goggles when I use the rotary tool. I like to see, and I don't want to mess it up.
When I paint anything larger than a postage stamp, I will get out the airbrush. The airbrush helps me make smooth even layers when I paint. It also goes a lot faster. I don't have an expensive one, but it's also not dirt cheap. I started out airbrushing with the cheapest brush I could find and learned how to use it and how to care for it. Once I figured out how to work it pretty well, it went and broke. Go figure. So I went up a level or two and bought a nicer one that had a couple features, and that would last too. I also got a compressor. It cost me $100, but after going through dozens of propellant cans, this was a smart move. Propellant cans don't provide a constant pressure and cost about $12-15 a can. After about 8 cans, I would be spending more than the compressor. I recently got a compressor with a 1 gallon tank on it too. It came with a pressure regulator and it really smoothes out the paint flow. I also bought a moisture trap. If you live in a humid area, get one. A little bit of water can ruin your paint job, and the traps can be dried out just by disconnecting them for a while.

There are of course more tools out there and more expensive forms of what I've shown here. But these work for me, and I like them. You can buy things like miniature drill presses and table saws. There are supplies out there to make molds and casts of pieces so you can make multiple identical items. You can even get paper to make your own decals. If you see something you want to try, go for it. Beginner set exist for just about any item out there, and they usually have good instruction. Just remember, it's not great tools that make a great model. It's the builder that uses the right tools that makes a great model.