
Deep Exploration
Ok, now that we have the model out we can open it in Deep Exploration for our conversions. Once you open up the directory where the model is located, you'll see the problem. There's more than one model. And to make things worse, they are all just parts of the same model. Talk about a pain in the rump!
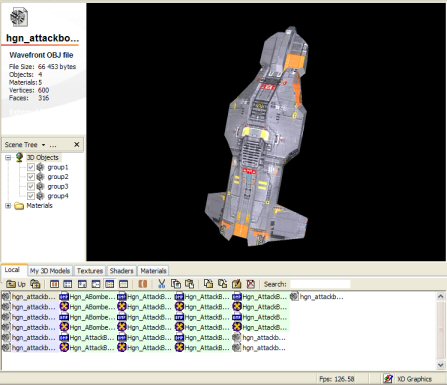
All these model parts!
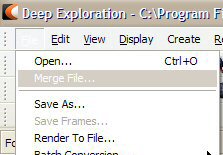 So, here's how we fix the problem. Open the first model in the list. It's usually the main body of the model. Then go to the File menu and then 'Merge File...' This will open up a dialog box, so just navigate to the folder with the models in it and pick the next one in the list. You'll probably see some extra parts show up on your model. Keep doing this until you get all the parts of the model. If you accidentally add to many parts, you can just press 'Ctrl-Z' and it will undo the merge. Models with parts that move will have the moving parts appear in the center of the model. All other parts show up normally. Once you get all the parts together, you can save it as a .cob in the same directory, and you'll be good to go. Don't worry about them not being in the right spot, we can fix that in Metasequoia, remember? Sure you do. If not, I'll show you in a later step.

All together! Well, sorta...
Funky Textures
 But what if your model comes out like this? What the hell is going on here? The model looks like the right shape, but the textures are totally screwed up. I mean really screwed up. Well, that should give you a clue. The problem is in fact with the textures, but it's not that bad. It's pretty easily fixed. All we need to do is tell Deep Exploration what files it really should use for the textures. My guess is that the HOD Tool is using the wrong file names for the textures and it's messing up the model. It took me a while to figure out an easy way to do this, and it's not really fool proof, but it works well enough for this step. We'll fix any remaining problems later.
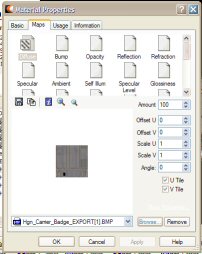 First, expand the Materials list in the Scene Tree in the center of the screen. Then double click on one of the materials. On the Material Properties dialog that pops up, click on the Maps tab. Now, on the bottom, click on the 'Browse...' button and pick a different file for the texture. If you move the dialog box out of the way, you can see what the texture will look like after you highlight a new one and before you click 'OK.' This way you can go through the textures to make sure you get the right one. Also, make sure you pick the .bmp files. If you pick a .dds file, the model will have big black areas once you save it as a .cob. It will also overwrite all the .bmps with the 'new' ones with black patches, so you'll have to go back and re-extract them with the HOD Tool. Trust me, it's a pain in the butt. I usually save the re-mapped file as the same thing so next time I open it up, I won't have to deal with the same problem.
What I like to do when the textures are messed up like this is to first fix them on the main model. Then I merge a part to it and fix the textures on the new part. This way I can see if I if the textures match up. There will be mutiple textures with the same name, but that's ok. Just work down the list until you get to the bottom. And if a piece looks like it isn't using the right texture, try changing it. Also, sometimes you might have a hard time seeing if the textures are in the right spot. But a rule of thumb is if you change one, you need to change another. The Hiigaran Ion Cannon Frigate is like that. It may look right at first, but once you change the texture, you'll see it looks better a different way.
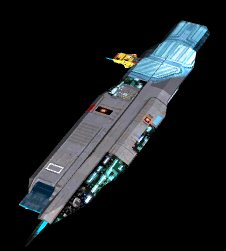
Oh, here's the Hiigaran Carrier with the textures switched around so it's right.
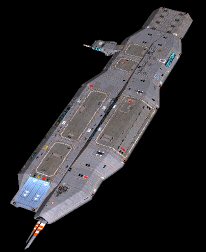
That's better
There is one more problem that can crop up. Sometimes the 'badge square' will use the same texture as another area when you are viewing it in Deep Exploration. When this happens, you can't make it so both the badge square and the rest of the ship all use the right textures. No big deal. Just leave the badge square incorrect. We can easily fix that in Metasequoia. So, now let's change some colors and put on that badge.